What is a view?
A view in Bommer for SOLIDWORKS defines an ordered set of columns you want to see in your bill of materials (either in the live view or in your exported BOM). A view is named and can be selected from within the Bommer add-in task pane; a view also holds metadata about the columns (such as column widths) so you can customize your bill of materials to your liking.
What is the "live view"?
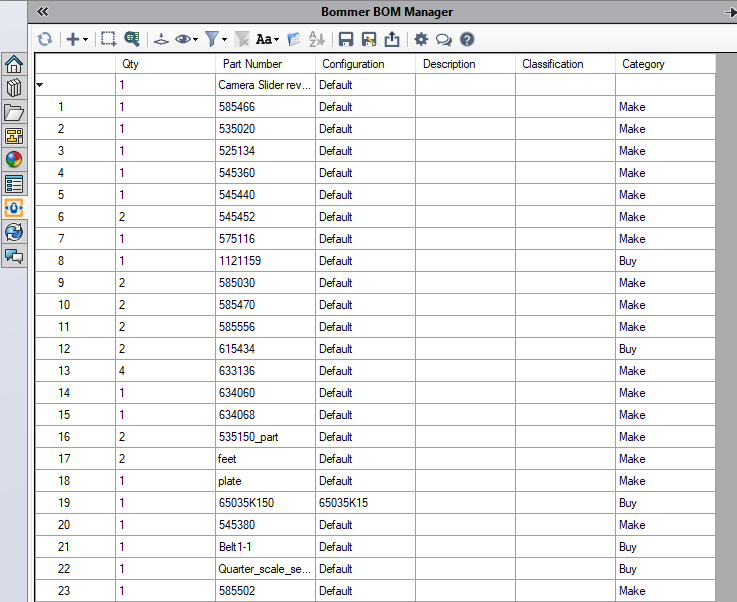
The live view is the main table within the Bommer add-in and is so called because it is updated live when your data within SOLIDWORKS changes. This table represents your bill of materials "at a glance", and is affected by filters and the selected named view (selected from the "Eye" icon dropdown menu).
Configuring your live view
When you first install Bommer your live view should look like what is seen below. Bommer does not come configured with any named views, so let's create one.

Once you click the Eye button demonstrated above you will see a menu like this pop up.

Press the Edit Views button and you will be taken to the next menu.
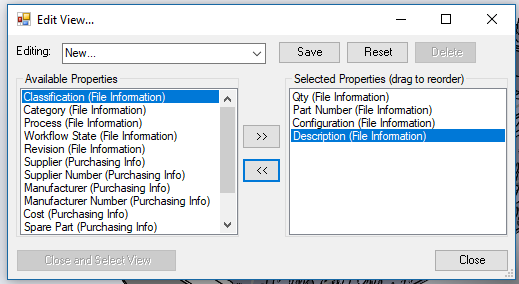
Edit View menu

The above image shows the Edit View menu when you are creating a new view. By default, the view that is active/selected in Bommer will be selected when this window is opened. To create a new view, ensure "New..." is selected in the "Editing" dropdown.
Editing an existing view
If you wish to edit a view that already exists, change the "Editing" dropbox to the view you want to edit. Everything else works as described below.

There are two property lists on this screen. The one on the left shows all your Bommer properties (see Configuring your properties for more info on configuring your properties). On the right, we see the properties that are selected for this view. The buttons in the middle move properties from left to right (available to selected) or from right to left (selected to available); use these buttons to select or deselect properties for your view.
If you press an Available Property and click the >> button, it will shift it to the right. If you wish to move a property out of your view then select it in Selected Properties and press the << button and it will be shifted back to Available Properties. You can select multiple available properties (to move in one step); you can also reorder your selected properties by dragging them up and down that list.
If you press an Available Property and click the >> button, it will shift it to the right. If you wish to move a property out of your view then select it in Selected Properties and press the << button and it will be shifted back to Available Properties. You can select multiple available properties (to move in one step); you can also reorder your selected properties by dragging them up and down that list.

Once you have the selected properties that you desire in your view we press the save button. Note that if you are editing an existing view and you wish to revert any changes between now and the previous save state for this view you can press the Reset button.

In an existing view this will save the view. If you are creating a new view then at this point you will get a prompt that will ask you to name this view.

Once the view has been named and saved you will see that the New... has changed to the name of your view; in this case, we've named the view BasicBom. After saving, you can press the Close button to close the menu or press the Close and Select View to close the window and select this view within Bommer.

Once selected you can see that the view is in effect: the columns represent the properties you selected in the Edit View window.

Bommer lets you make as many named views as you need for your workflow. For example, you may have different views for different stages of your project or one view to show structure and quantity, and another to show sourcing and cost information; it's entirely up to you! To toggle between these views just press the views Eye button and you will see a menu with your existing Views alongside the ability to edit and create new ones.

Comments
0 comments
Please sign in to leave a comment.